Pwnagotchi Case Assembly
Use index (table of contents) on the left of this page to navigate to which Pwnagotchi model you have for correct instructions, after reading the introduction and warnings below.
4/27/2024: We are looking for experienced YouTubers who are good at making video, to create step-by-step installation videos for us that we can embed on this page, showing how to assemble the Pwnagotchis and correctly install them into the cases. If you are interested in this, we can provide a free case for you for each video you want to make of each case type. Send us a message on Etsy or e-mail us: main@dunbartechnology.com with a link to your YouTube channel.
Introduction
We recommend watching Pwnagotchi assembly videos on YouTube first before assembling the Pwnagotchi into the case. Before using our cases, you should have a good knowledge of how to build and assemble a Pwnagotchi. You can find a good YouTube videos here:
https://youtu.be/XA4j9hRiFmw
https://www.youtube.com/watch?v=g1yj6HAnjWc
https://www.youtube.com/watch?v=EfQyFxkKp1o
https://www.youtube.com/watch?v=i-Txv8VVg3E
Info + Warnings
We are not responsible for any damage to your Pwnagotchi hardware. This is a plastic case designed to fit very precisely, and wrongfully assembling it can lead to damage if care is not taken.
DO NOT LEAVE IN A HOT CAR
Most of our cases are printed with PLA plastic because of the good color options and Earth sustainability (PLA is corn-based and biodegradable); however this plastic has a low melting point of only 60c/140f which absolutely can happen in a vehicle on a hot summer day. If you leave your Pwnagotchi in your car on a hot day, the case will probably deform or melt. We are not responsible if this happens so please take care. If you want extra heat resistance, you can order our cases in PETG plastic which is more temperature resistant, however we have far less color options available (Currently: Black, White, Gray, Red, Green, Orange, Translucent Purple, Translucent Orange, Translucent Green).
Tight Tolerances
Cases are designed to fit the assembled Pwnagotchi snugly. When inserting any parts, be gentle. Your Pwnagotchi hardware should not break if you take care, but it can happen if you try to force anything too hard.
Ribbon Cable
The ribbon cable for the screens tend to be very fragile, please take extra care with this. Do not ever bend the ribbon cable at a sharp angle and do not crush from the sides.
SD Memory Card
The SD memory card for the Pi Zero board should be inserted after the case is fully assembled, through the slot in the side for it. If you install the Pi Zero into the case with the SD card already inserted, it can catch on the case and break your Pi Zero. You may need to use a pin to help push it in on some cases, the slot for it is very deep through the case.
Case Modifications
There are many variables in the 3D-printing process that can cause each Pwnagotchi case to be slightly different than the last, including but not limited to:
- Different color plastics print differently (different dyes have different properties)
- Humidity makes plastic shrink/expand
- Air temperature makes plastic shrink/expand
- And more
Because of this, sometimes the cases may require slight modification, but normally this is not necessary. We have carefully crafted the instructions below to alert you when some modifications may be necessary and what to check. For quick reference however, here’s a partial list:
- Plastic buttons for the PiSugar 2/3 cases. Do they fit in the holes smoothly or are they slightly too tight? We make these to be a snug fit so that they do not rattle around, but sometimes the plastic can expand slightly in your environment causing the buttons too be too tight to push smoothly. You may need to slightly “shave” away the sides of the buttons a little bit with a razor knife. BE VERY CAREFUL NOT TO SLIP AND CUT YOURSELF. We recommend placing the buttons in a small vice, pliers, or vice-grip pliers before shaving them with a razor knife so your fingers are not near.
- Shelves for the PiSugar 2/3 cases that the PiSugar and Pi Zero boards rest on. Are they too tight? We have to print these with “break-away supports”, and when we break away the supports before shipping, we clean them up, but sometimes we can miss a little bit of extra plastic on darker materials. You may need to cut a little bit more away on your own with a razor knife if you think the circuit boards are too tight. BE VERY CAREFUL NOT TO SLIP AND CUT YOURSELF. Always hold the case from the outside when using a razor knife inside, and do not put your fingers in the direction you are cutting.
- “Hairs” or “Strings” on the case. These are very very thin strands of plastic that may be leftover from the 3D-printing process when the environment is a bit more humid than normal. We do try to clean all these up before shipping, but sometimes because they are so thin (thinner than a human hair) they can only be seen under certain lighting conditions or angles and we may miss some. You can remove these easily by “zapping” them quickly with a heat-gun or hair dryer (do not hold the heat gun against the case for more than a few seconds). You can also heat up a soldering iron very hot and hold it next to the strings.
— PiSugar2/3 + Waveshare 2.13″ —
Included Parts
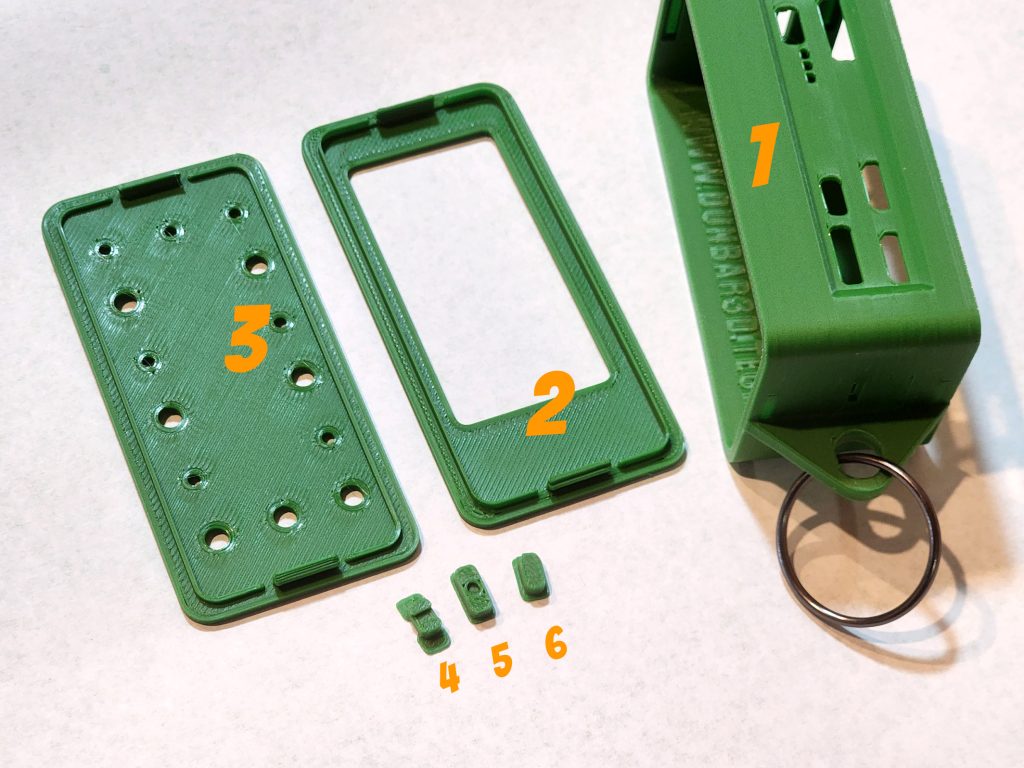
- Case (main body)
- Top cover (lid) for Waveshare 2.13″ screen
- Bottom cover for PiSugar side of case
- PiSugar2 sliding power switch (use for PiSugar2 only)
- PiSugar3 power button (use for PiSugar3 only)
- Program button (all models)
Special Notes
UNIVERSAL FIT! This case is universal fit for both PiSugar 2 and 3 which have buttons and LEDs in different locations. As such, you may see some extra holes that don’t line up to anything, but rest assured this will help give your Pwnagotchi extra breathing to stay cool.
BUTTONS! Included are two little plastic buttons and one little sliding plastic switch. PiSugar2 uses the sliding switch (4) and the program button (6). The PiSugar3 uses the program button (6) and the power button (5). The power button can be distinguished from the program button because it has a little circle on it.
Assembly Instructions
The following instructions only show proper insertion into the case, you are still responsible for knowing how to make the electrical connections and how to tighten the screws as in any other Pwnagotchi build without a case.
IMPORTANT: Instruction photos do not show using the plastic screws that are included with the PiSugar to screw the Pi Zero to the PiSugar battery. You should still use the screws to hold the boards together before installing the case covers and before installing the Waveshare screen, because the pins on the PiSugar are spring-loaded, and it will also help hold everything together in the case. The case covers may not fit properly if the boards are not screwed together using the proper screws and standoffs.
Before starting assembly, remove plastic covers (lids) from case if they were shipped installed, and make sure your SD memory card is not inserted onto the Pi Zero. Scroll down this guide to see how to properly remove/install the covers in step 10. But to remove them, bend the covers up a little bit in the middle and they should pop out easily. The SD memory card must be inserted at the last step.
1. Place buttons inside case holes. For both PiSugar2 and PiSugar 3, you will place the program button in the hole circled #2 below. For the PiSugar2, you will be placing the sliding switch in the hole circled as #1 below. For the PiSugar3, you will not use the sliding switch and will instead insert the power button (has a small circle on it) into the hole circled #1. You can use a small piece of tape on the outside to help hold the buttons in place temporarily.
NOTE: Plastic can shrink/expand slightly due to changing humidity and temperature. If the buttons are a bit too tight in the holes, you can take a razor knife and very carefully trim the edges of the buttons a little bit or make the holes in the case a little larger. Only a very slight shaving of the plastic should be necessary. BE VERY CAREFUL NOT TO SLIP AND CUT YOURSELF. We recommend placing the buttons in a small vice, pliers, or vice-grip pliers before shaving them with a razor knife so your fingers are not near.

2. Unstick battery from PiSugar board (it’s held on by a magnet).
IMPORTANT! If you are using PiSugar2, be sure the indentation for the power switch on the sliding switch lines up with the power switch on the PiSugar2 circuit board before inserting it in the below steps, else it can break the switch off.
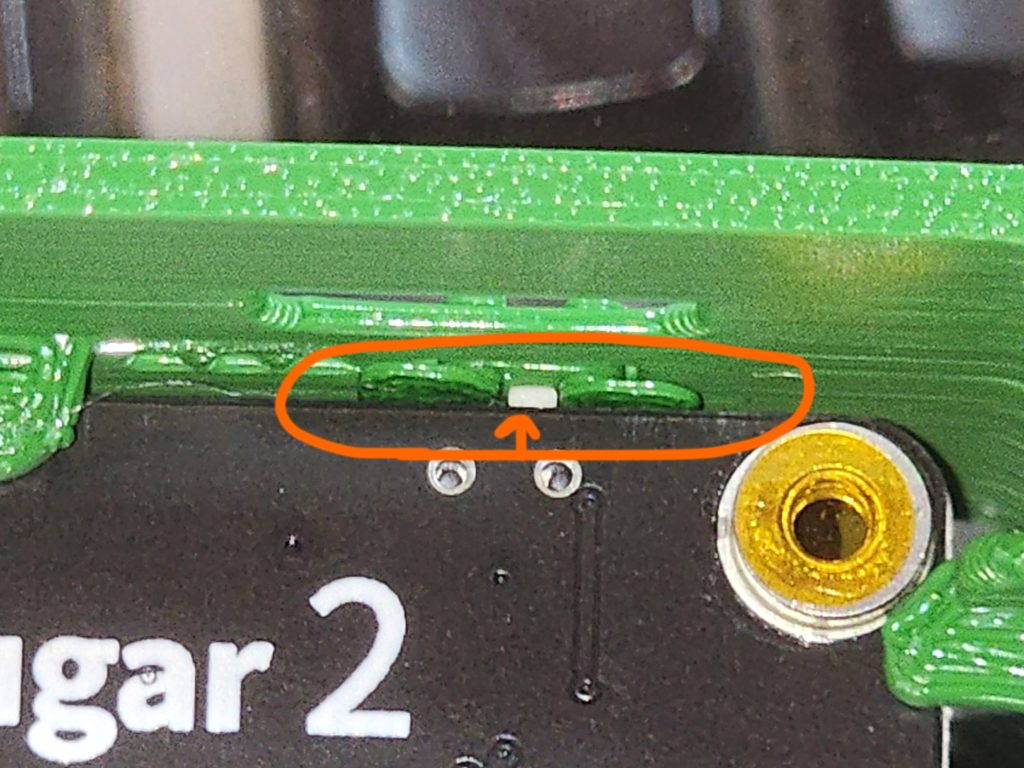
3. Place PiSugar board inside the case like in the photo below. You may have to push on it a little bit to get it to sit flush on the “shelves”, push firmly but carefully not to apply too much force.


4. Place the magnetic battery pack in.
5. Turn over the case, and insert the Pi Zero board, be sure to insert correctly with the ports facing the correct direction.


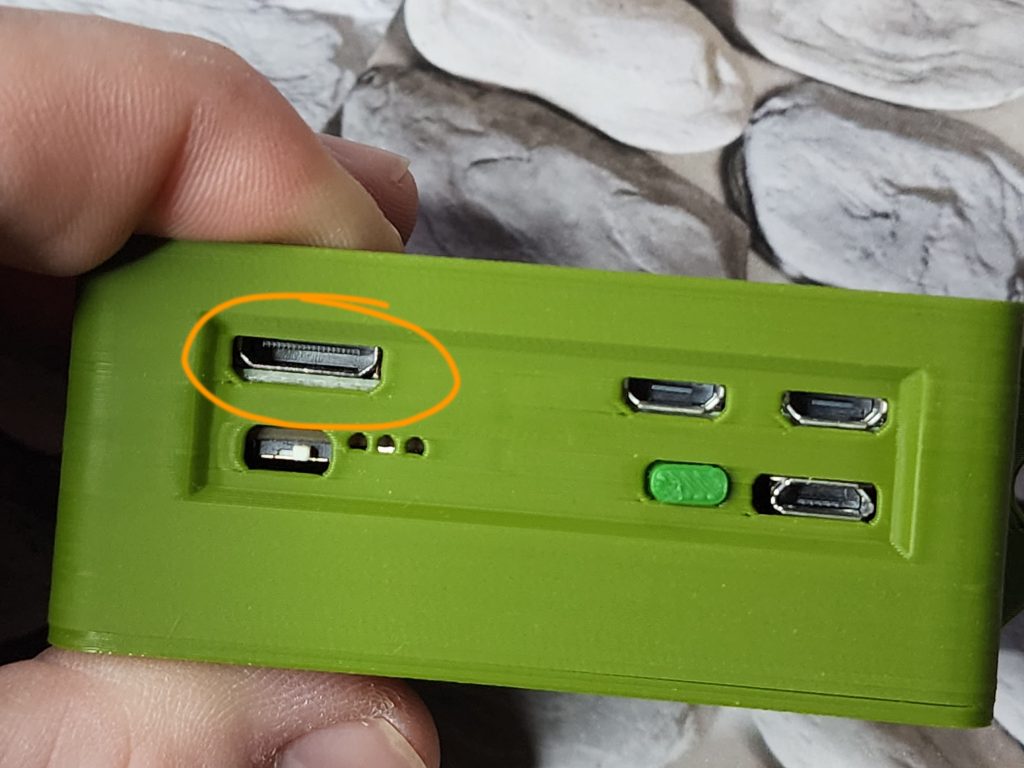
6. Check that all the ports line up correctly. In the below photo, you can see the HDMI port is not correctly aligned. This normally does not happen, but in this example, we need to fix that. NOTE: Photos show Pi Zero W board without header soldered on, you need to solder header pins onto the W board or buy the WH board with the headers pre-soldered on.
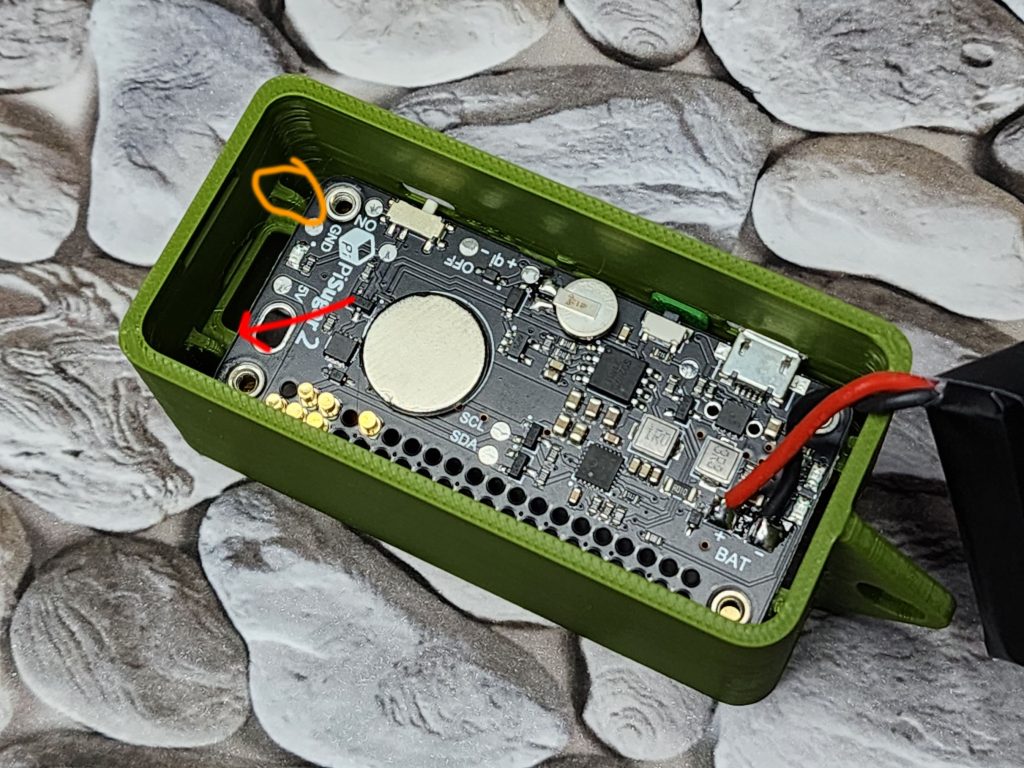
7. Below, you can see there was an excess build up of plastic during the 3D printing process that is causing the Pi Zero board to not sit flush on the “shelves”. In most circumstances we will not ship a case that isn’t properly cleaned up, but if we miss it (some colors are harder to see), you can fix it by using a razor knife like below. Very carefully trim the excess plastic like in the below photo.


8. Screw the PiSugar board and the Pi Zero together using the plastic screws that were included with your PiSugar (we do not provide the screws). You screw these from the top-down through the Pi Zero board and into the PiSugar. Some PiSugars ship with a clear tape over the screw holes, you should pierce these with a pin first or you may have trouble trying to get the plastic screws to screw in.
9. Install Waveshare screen like below. Be aware this case is designed to use the GPIO pins for connection, not a ribbon cable. DO NOT use a ribbon cable for connection. Please be sure the GPIO pins are installed correctly per standard Pwnagotchi, PiSugar, and Waveshare instructions. The below photo does not show the screws holding the boards together, please secure the screws (provided by PiSugar) before installing the Waveshare screen as per PiSugar instructions. NOTE: Photos show Pi Zero W board without header soldered on, you need to solder header pins onto the W board or buy the WH board with the headers pre-soldered on. Sorry for the confusion in the photo.


10. Install the covers. The covers snap in place; to install them easily, tilt one end and put it in, then slightly and gently bend the cover upwards in the middle to push down on the other side of the cover to lock it in place.
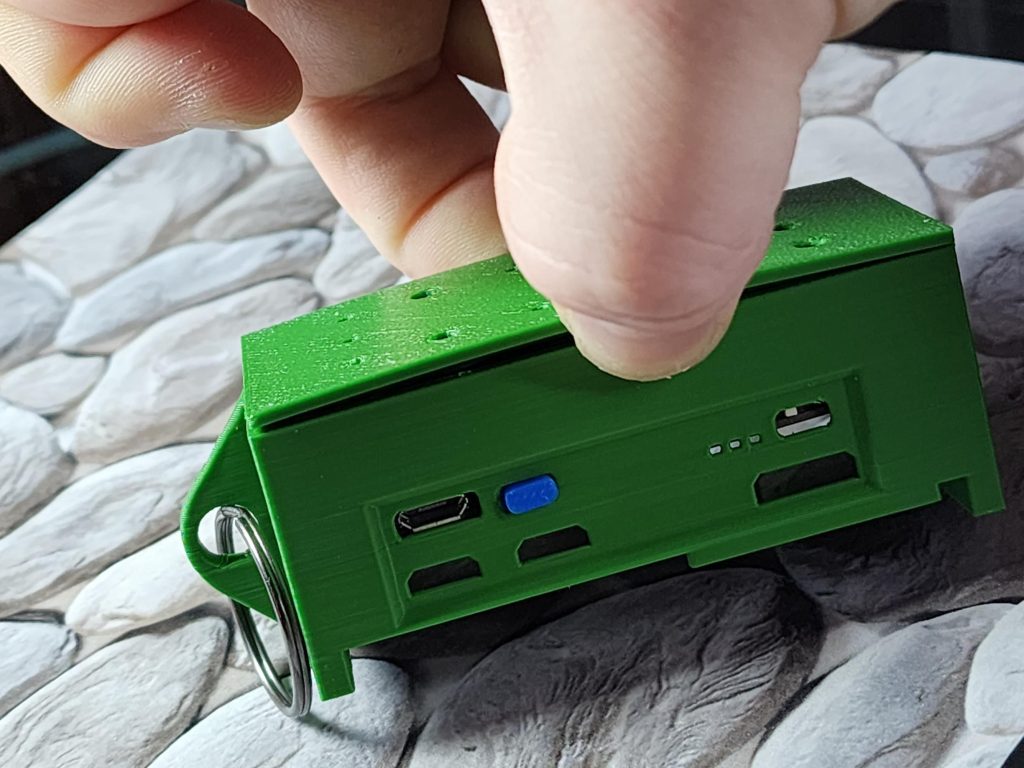


11. Insert SD memory card in the case from the side, there is a slot for it. You may need to “poke it in” with a toothpick or similar item to get it to seat all the way.
12. Done! Boot up your Pwnagotchi and follow the Pwnagotchi instructions elsewhere on the Pwnagotchi websites to flash the memory card and do any other software installations needed.
— PiSugar2/3 + Waveshare 2.13″ TOUCH —
Assembly Instructions
Everything else applies from the non-Touch instructions above, except the items below.
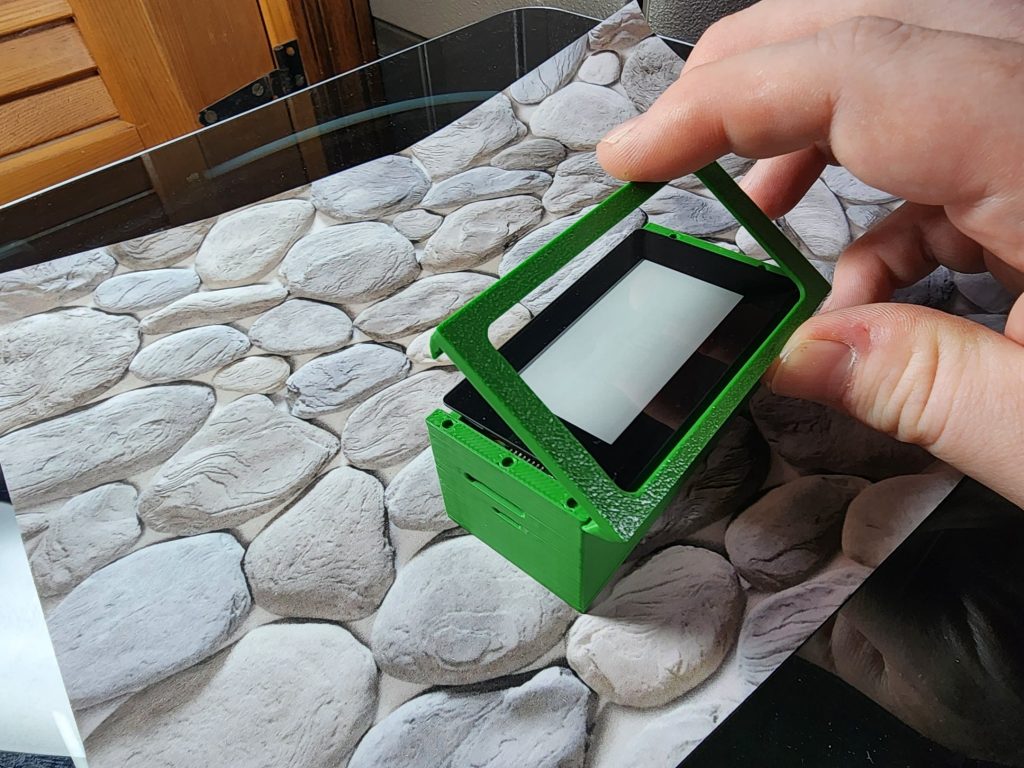
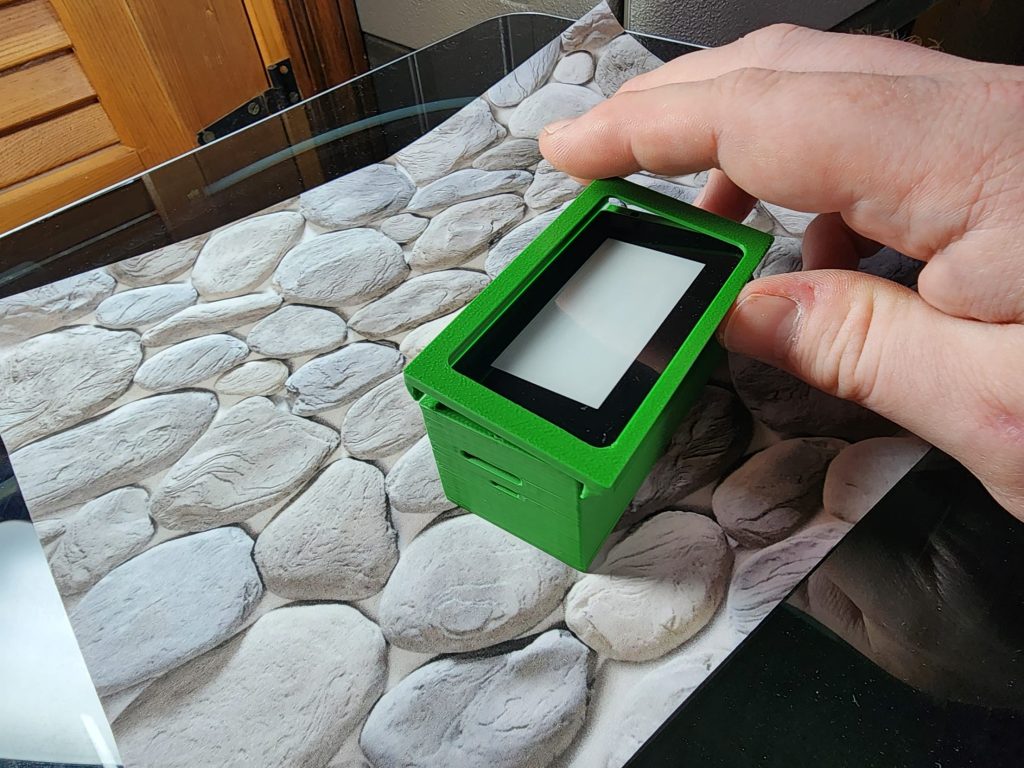
DIFFERENT TOP LID! To accommodate the larger touch screen, this case has a different lid. You must slide this over one side of the screen at an angle (the side of the screen that sticks out more near the buttons and ports) and then tilt it backwards onto the back side, it will then fit.
This lid has little pegs that will snap into place into the holes on the case. There are two pegs on one side, and three pegs on the other to help you know which side is which.
If the lid is not a tight fit, we recommend a small dot of superglue in the corner of the lid to help keep it on.
— PiSugar1 + Waveshare 2.13″ —
Assembly Instructions
The PiSugar v1 has much different buttons and layout than the PiSugar2 and PiSugar3. Guide for this one is a work in progress but please read the following notes:
- The hardware slides in from the side the cover goes on.
- You are going to assemble the Pwnagotchi before sliding it in.
- There is a little button included in a plastic baggie, you place this inside the little groove on the inside of the case, and the button wedges between the case and the button on the PiSugar1.
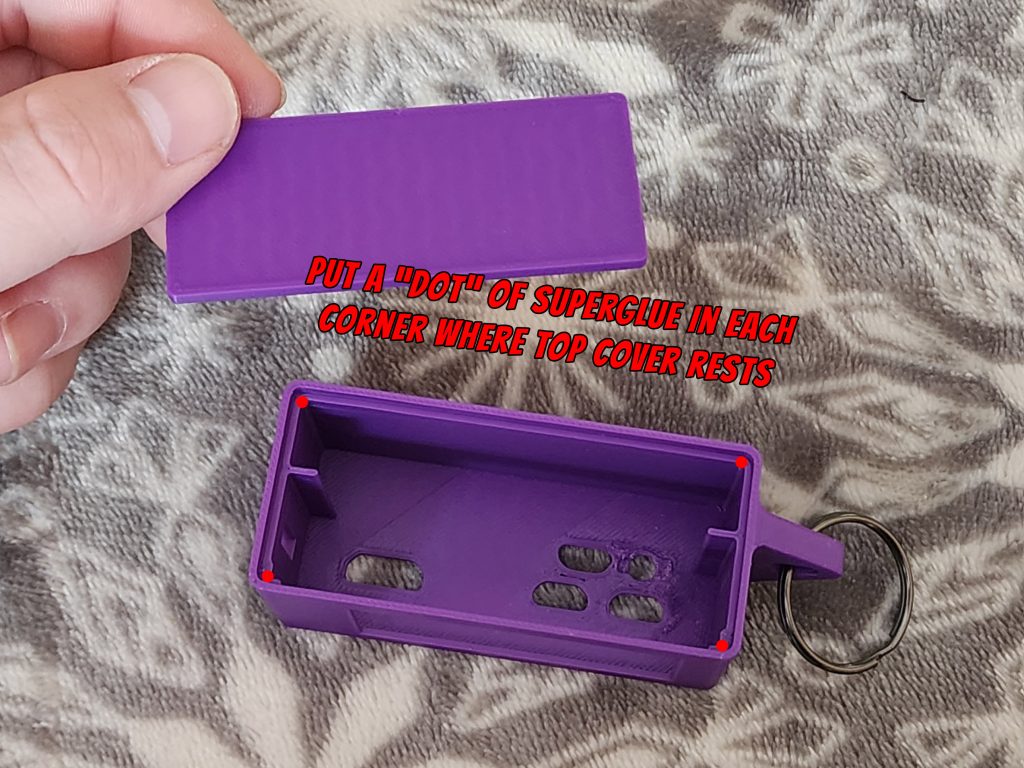
- The lid/cover does not snap on, it just rests in place. When you are happy with the fit of everything inside the case, apply a very small “dot” of superglue in each corner of the lid and that will hold it on very nicely. Allow 1 hour for superglue to dry and bond.
— No Battery + Waveshare 2.13″ —
Assembly Instructions
If you choose not to buy a PiSugar battery, the Pwnagotchi can still be connected via USB or external battery pack. We sell much smaller cases that can fit just the PiZero + Waveshare display. Below are general assembly instructions, but this part of the guide is still a work in progress:
- You will install the Waveshare screen to the Pi Zero board (see above guides for other cases, or follow YouTube videos to see how to install the Waveshare screen).
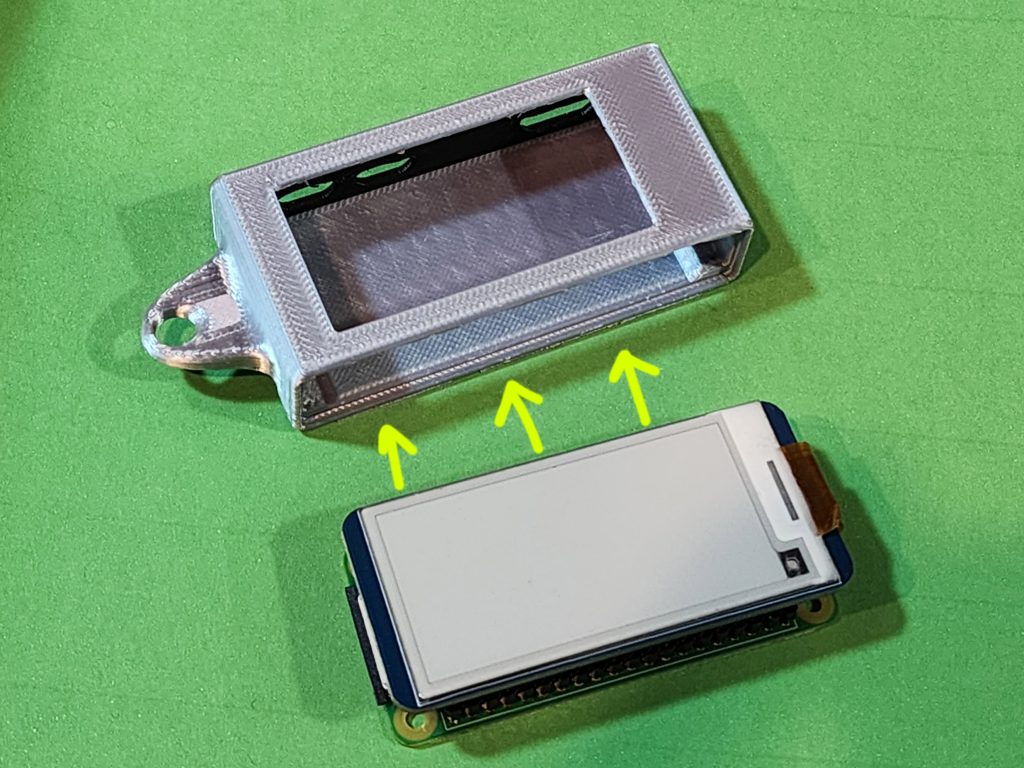
- After they are assembled, you will slide this combined unit into the plastic case from the side (open side). Be aware of proper insertion orientation so that the ports on the Pi Zero board match the holes in the case.
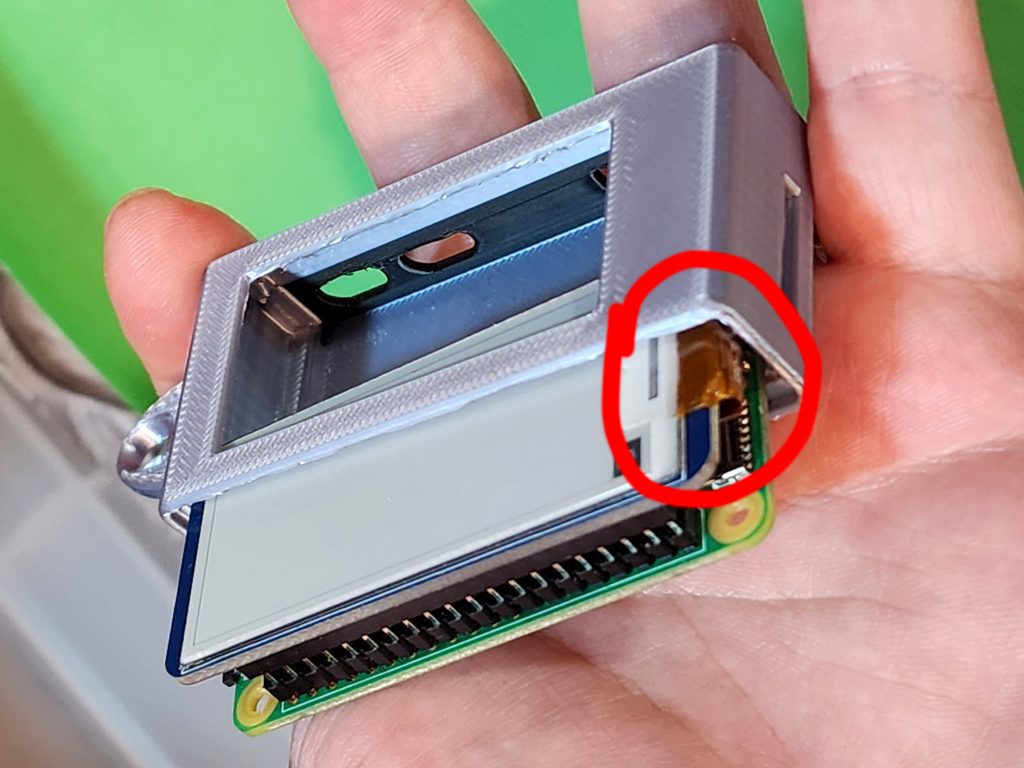
- IMPORTANT: The case is very snug fit and may rub the ribbon cable or can damage it. We recommend angling the side with the ribbon cable inward first and then very carefully straightening the Pwnagotchi unit and sliding it in very slowly. Check as you are sliding it in to make sure the ribbon cable it not being crushed. See below photo. If the ribbon cable becomes damaged you may need to buy another Waveshare screen, we are not responsible. Please insert carefully.
- Install the cover (lid). It should snap in very snugly but we still recommend apply a small dot of superglue to each corner of the lid to hold it on securely. Be careful to only use a very small “pinhead” amount of superglue and put it in a spot that will not be seen from outside the case. Superglue if too much is applied and leaks out can discolor the case.
— UPS Lite + Pimoroni 2.0″ —
Assembly Instructions
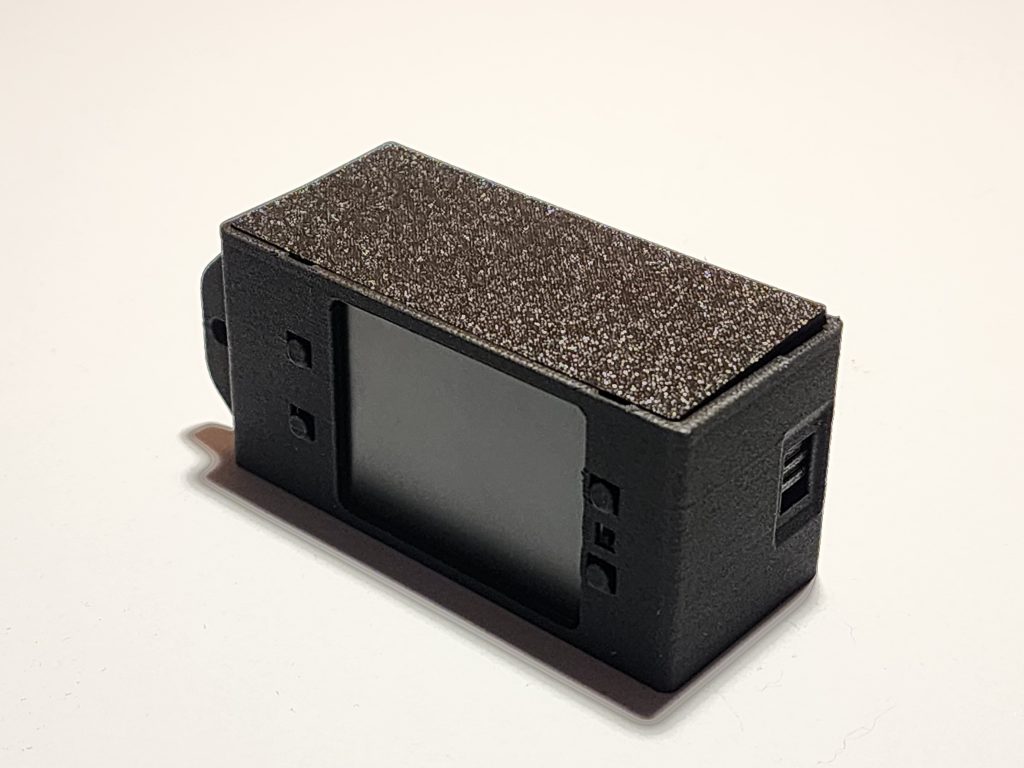
This specially designed case fits the UPS Lite battery with the Pimoroni 2.0″ screen. Basic instructions are:
- Fully assemble the Pwnagotchi unit outside the case.
- Insert the printed button onto the power switch of the UPS Lite. There is a groove on it for the power switch and a groove where it clips onto the circuit board of the UPS Lite:
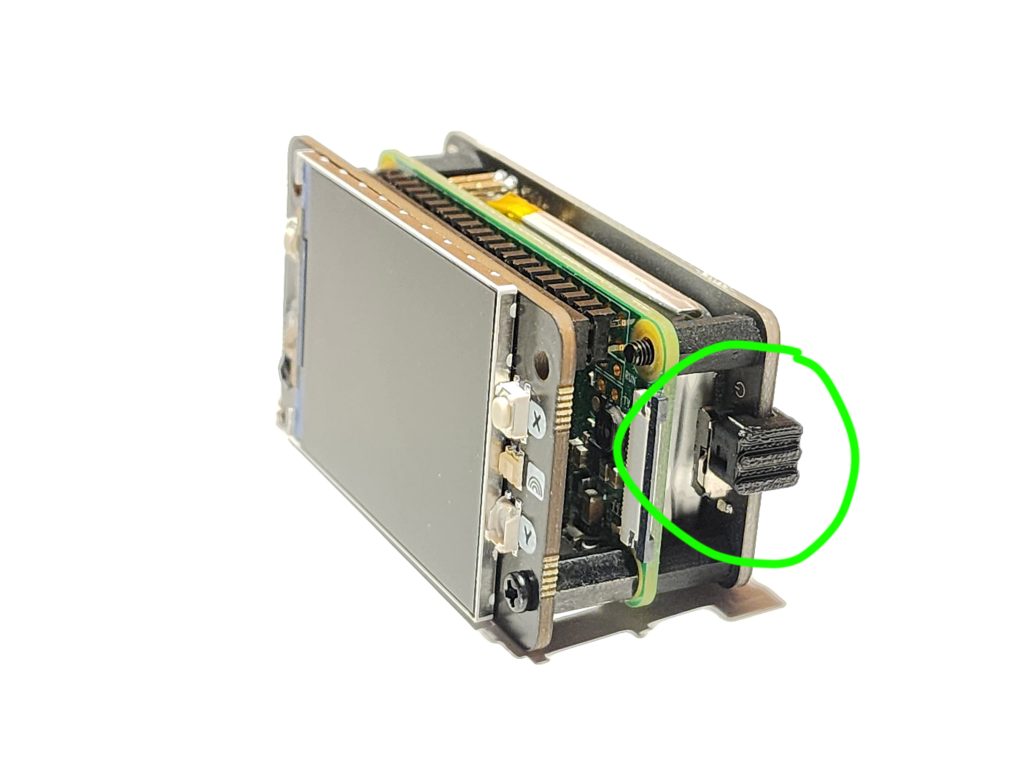
3. Insert the unit from the top. BE VERY CAREFUL THE BUTTONS ON THE PIMORONI SCREEN DO NOT RUB OR CATCH ON THE FRONT OF THE CASE. THE BUTTONS ARE VERY FRAGILE ON THE SCREEN AND CAN BREAK OFF. We recommend pushing on the screen a little bit as you are sliding it in:
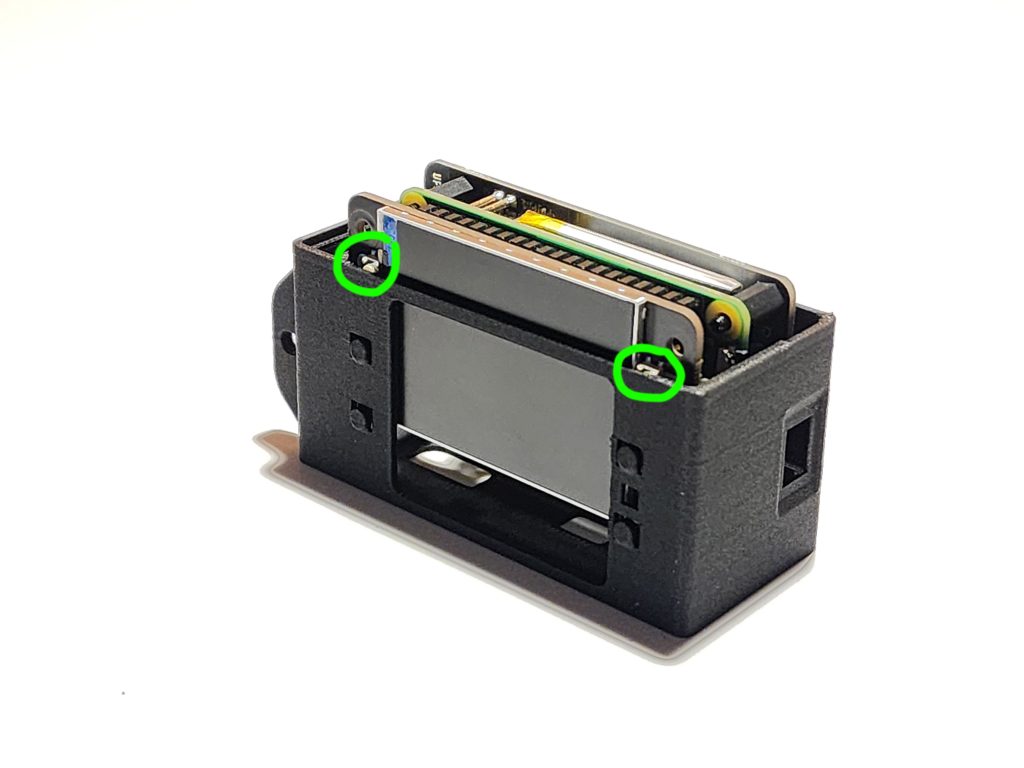
4. The lid snaps onto the top, but will not stay on securely. You must add a few small drops of superglue to the large back “shelf” where the lid rests on. Be careful not to get the superglue onto the outside of the case as it will discolor the case:
— Slimagotchi “Slim Mod” + Waveshare 2.13″ —
Assembly Instructions
Before starting, please watch the following YouTube video to learn how to create a Slimagotchi. This shows the process of making the Pi Zero and the Waveshare screen into one slim unit, but does not show the PiSugar Battery as part of the process.
Once you have that assembled, most items related to the case from the regular Pwnagotchi instructions further up this web page apply to the Slimagotchi case as well. However, please read the following notes:
- You will ignore the instructions about connecting the screen with the GPIO pins from those instructions as your screen is now part of the Pi Zero as one unit.
- Because of the destructive modification nature of the Slimagotchi mod to the hardware by user modification, it’s possible our Slimagotchi case may not be an exact fit as different users may modify it slightly differently.
- Our Slimagotchi case dimensions are based off of the official PiSugar Slimagotchi case designs and what they determined is the best fit for the PiSugar on a Slimagotchi.
- The case has been tested with the two most common Slimagotchi builds available on YouTube.
- We added an extra 0.8mm of tolerance height at the top of the case above the screen to accommodate differences in user modifications. If the cover that goes over the screen is not snug or flush (has a gap) you can wedge a small piece of paper between the non-visible edges of the screen and the cover to make it a snugger fit.
- In particular, the biggest variance is the cut pin heights, some users accidentally cut them too short or too tall so we designed the case to be as universal to that as possible.
- BE VERY CAREFUL WITH THE RIBBON CABLE ON THE WAVESHARE SCREEN. It is very fragile. Do not crease it and do not crush from the sides. Take extra care with it.
- If anything else with the case seems too tight (such as the shelves the circuit boards rest on) you can either trim them down carefully with a razor knife, or carefully melt them a little bit to deform them with a soldering iron heated to 220 Celsius. Heating the plastic to 220 to 240 Celsius will not make the non-toxic plastic release any toxic fumes.
- We are not responsible for any damage to the case due to your modifications, so if modifications are needed, please do them very carefully and slowly.
— Antenna Cases —
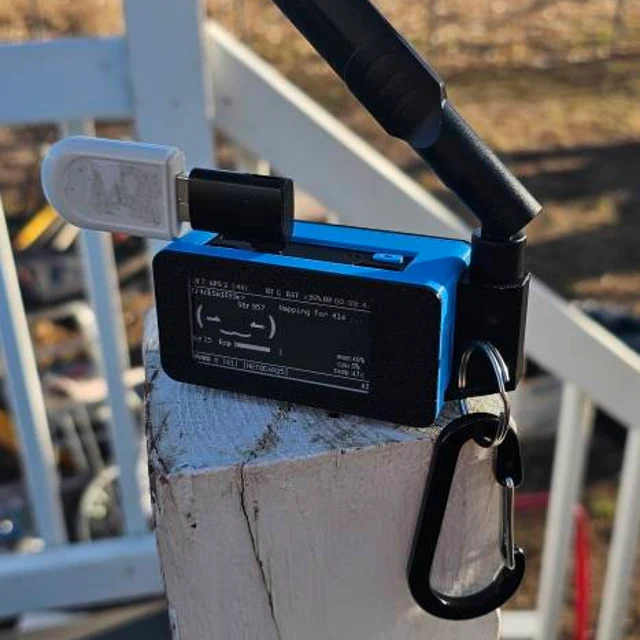
We offer cases that are made to house an external antenna, as seen above (photo credit to our customer Heriberto Barboza). Our antenna cases will only fit the PiSugar S/2/3 + Waveshare 2.13″ screen (NO SLIM MOD) or the UPS-Lite + Waveshare 2.13″ screen (NO SLIM MOD) so choose appropriately. They have been tested to work with the following antenna, so we recommend ordering this one:
https://www.amazon.com/dp/B01KBU61S8?ref_=cm_sw_r_apan_dp_AEE2XHQ0NK79MH2S0XCN&cafHiResImg=1&language=en-US
However, most Antennas of similar design to that one should work, as long as it’s the same diameter at the base of the plastic part.
If you haven’t ordered your hardware yet, we recommend the PiSugar S/2/3 version of the antenna case if you want a better case design with more customization possibilities and a permanent antenna installation; or we recommend the UPS-Lite version if you want a modular antenna design and the ability to unscrew the antenna easily in the future if you want to remove it.
Antenna Case Instructions
For PiSugar S/2/3 Case:
- Connect the SMA wire pigtail to the bottom of the antenna by screwing it on tight.
- Route the SMA wire through the antenna “holder” on the side of the case and into the case.
- Push the antenna into the case while pulling the SMA wire through.
- MAKE SURE THE ANTENNA IS IN THE ORIENTATION YOU WANT IT TO BE WHEN IT FOLDS (usually side to side).
- If it’s a tight fit but you can get it in, just apply a small amount of force and it should stay in.
- If it’s a loose fit, you will have to add some glue (superglue is fine) inside the antenna holder and push it back in.
- If it’s a super tight fit and you can’t get it in at all, you may need to use a dremel tool to gently “widen” the inside of the antenna holder to make it a bit bigger.
- Solder the SMA wires to the electronics board and follow all other antenna+pwnagotchi software instructions.
For UPS-Lite Case:
- This is made slightly different than the PiSugar S/2/3 Antenna version. For this one, the antenna main-body sits on top of the case and screws on.
- Undo the brass nut from the threaded connector, stick the SMA connector from inside the case and push the threaded part through the hole so it’s exposed, then using the nut that comes with the antenna, thread it on the outside so it’s secure.
- Screw the antenna onto the threads from the top of the case.
- Solder the SMA wires to the electronics board and follow all other antenna+pwnagotchi software instructions.
Antenna Instructions
We don’t provide support on how to install the antenna to the Pi Zero board, but you can watch the following video:
— FAQ & Common Problems For All Cases —
Problems With Fit
Q: The cover/lid for the Waveshare display is not tight to the screen.
A: You can slide a small single piece of paper and wedge it between the lid and the screen along the edges (under the lip, hidden) to make it more snug. Unfortunately we must design this with a little bit of “wiggle room” as everyone’s Pwnagotchi builds can be slightly bigger or smaller.
Q: The cover/lid for the Waveshare display seems to bow upwards in the middle once installed.
A: It’s a tight fit and sometimes due to manufacturing tolerances your GPIO pins that separate the screen from the Pi Zero may be small fractions of an inch taller than standard. There are a few solutions you can try:
A) First be sure that the screws holding the Pi Zero to the PiSugar are snug. You do not want to over-tighten these and crack the circuit board but they should feel snug. If they seem a little loose, tighten them down a bit more.
B) Glue the cover down in the middle to the case with a very very small amount of superglue applied with the tip of pin or toothpick. Be careful it does not leak out the front when snapping the lid down as the superglue can discolor the case depending on the color of the case you chose. We recommend applying the superglue to the top lip of the case and not to the cover.
C) Trim the little shelves down that the Pi Zero rests on with a razor knife, just a little bit at a time checking the fit after each trim.
D) Using snips, cut the GPIO pins slightly shorter, just a very very small amount at a time while checking fit.
NOTE: We are not responsible for any of the modifications above if they do not work or damage anything please use at your own risk and only make modifications very slightly at a time.
Q: Some part of the case seems to be too tight.
A: Please understand that we make these cases out of plastic and plastic can shrink/expand in different temperatures and humidity during shipping across the world, and these are manufactured using very tight tolerances. If something is fitting too tight, you can attempt to cut a small piece out of the case with either a razor knife, or use a soldering iron to “melt” the plastic a little bit (be very careful). We use non-toxic biodegradable plastic and it should not release any toxic fumes when heated. You can also use a heat gun or hairdryer to soften the plastic a little bit and bend things if needed.
Q: Some of the holes for the ports don’t line up, has gaps, or there are extra holes.
A: The case is universal fit for PiSugar2 and PiSugar3, which has slightly different ports, switches, and LED light location. We made the holes to be universal between the two. Any extra holes also have the benefit of helping to keep the hardware running at a cooler temperature and prolong longevity.
Q: One of the buttons you included seems wobbly or loose.
A: This is because we had to over-size the hole for that button so that the case would be compatible with both the PiSugar2 and PiSugar3, this is normal and the plastic button we provided should not fall out.
Quality / Finish Problems
Q: There are little strings or hairs visible on the case.
A: These are not hairs they are little strings of plastic from the 3D printing process. We try our best to remove them all but some are very hard to see sometimes. You can remove these by “hitting them” with heat from a heat-gun or hair dryer. You just need to heat them really quickly and take the heat away, and they should disappear. Do not heat the case for more than a few seconds or the case may melt/deform. You can also use a soldering iron and hold the tip of the iron next to the strings, and the heat coming off of it should be enough to make them disappear.
Q: I am not happy with the quality of the case, or the surface has imperfections.
A: Due to the nature of 3D printing some colors print better than others due to the dyes used in the plastic; there can also sometimes be small blemishes or areas that are more matte or shiny than other spots due to speed changes as it’s printing.
With 3D printed items, the object is printed in layers from the bottom-up and you may see small ridges or lines across the surface, this is normal, these are the edges of the layers, it will not be a perfectly smooth surface like an injection-molded part from a production facility.
You may also notice some blemishes on the outside of the case where there are “thin walls” such as opposite of the indentations for the lid snaps, this will show up more on darker colors.
Lastly, lighter colors may sometimes show imperfections if a small bit of burnt plastic drops on to the print as it’s printing, with a white case for example you might find a small black or brown dot somewhere on it.
We view our cases and our 3D printed products as being more “functional” than “attractive”, though we do our best to make sure they come out good when printing and won’t ship anything with any glaringly obvious problems. If you want a case that is very beautiful and perfect we recommend getting an off-the-shelf one that is made in a factory from an injection-molded process, however with this method you lose color options and the ability to customize.
Q: The transparent (translucent) case looks really bad.
A: Translucent materials are very hard to make and we do our best to make the case look best as possible but please be aware that when we use a translucent plastic it will tend to show more unwanted detail that would normally be hidden.
Q: I ordered glow-in-the-dark green but the case is white, or I am not happy with the surface finish.
A: The plastic is a white color but glows green, just like those little glow-in-the-dark stars that you had on your ceiling as a kid. Please also note that glow-in-the-dark plastic is more difficult to print, the glow bits are an abrasive material and the outside surface finish may not look as good as other materials.
Other Questions
Q: Can I add extra holes or modify the case?
A: You can use a drill bit in a power drill to add any holes anywhere you want just don’t damage the supports for the boards or the snaps on the lids. You can use a soldering iron on low heat (approx 220 Celsius, invest in a smart soldering iron with temperature regulation for $20 on Amazon) to re-shape or add any other small features.
Q: Do you provide a warranty?
A: Sorry no, we are a small business that makes made-to-order items we don’t have a warranty program.
Q: Can the case be painted?
A: Yes, clean it well and use acrylic paint.
Q: The image on my screen is backwards or upside down?!
A: You can flip the image on the Waveshare screen, you have to add “ui.display.rotation = 0” to the config.toml file. it is set by default to “ui.display.rotation = 180”.
More Videos
The following videos are not our videos but show the general process in creating a Pwnagotchi.
